How to Carve a Spatchcock Turkey
Want to know how to carve a spatchcock turkey? It’s easier than you think! Check out my tutorial below with all my tips and tricks, as well as a video of how to carve a turkey.
If you’re still looking for a way to prepare a spatchcock turkey, this dry brine recipe, as well as compound butter are my favorites!

Brazilian Kitchen Abroad is a participant in the Amazon Services LLC Associates Program, an affiliate advertising program designed to provide a means for us to earn fees by linking to Amazon.com and affiliated sites.
So you cooked a turkey by yourself—congratulations!! Now it’s time to carve it and lay it down nicely to show off your hard work to your amigos and familia. You want to display it as the centerpiece that it deserves to be, and I want that for you.
You’re proud of yourself! And, hey, so am I!
So let’s get started!
What you’ll need to carve a spatchcock turkey
- A large cutting board
- A boning knife
- A chef’s knife
- Paper towels—for wiping and cleaning your surface as you go
- A cooked spatchcock turkey—you guessed it!
How to carve a spatchcock turkey
First and foremost, before you start carving your turkey, make sure you let it rest for about an hour so that the juices don’t stream out of it as you’re slicing it.
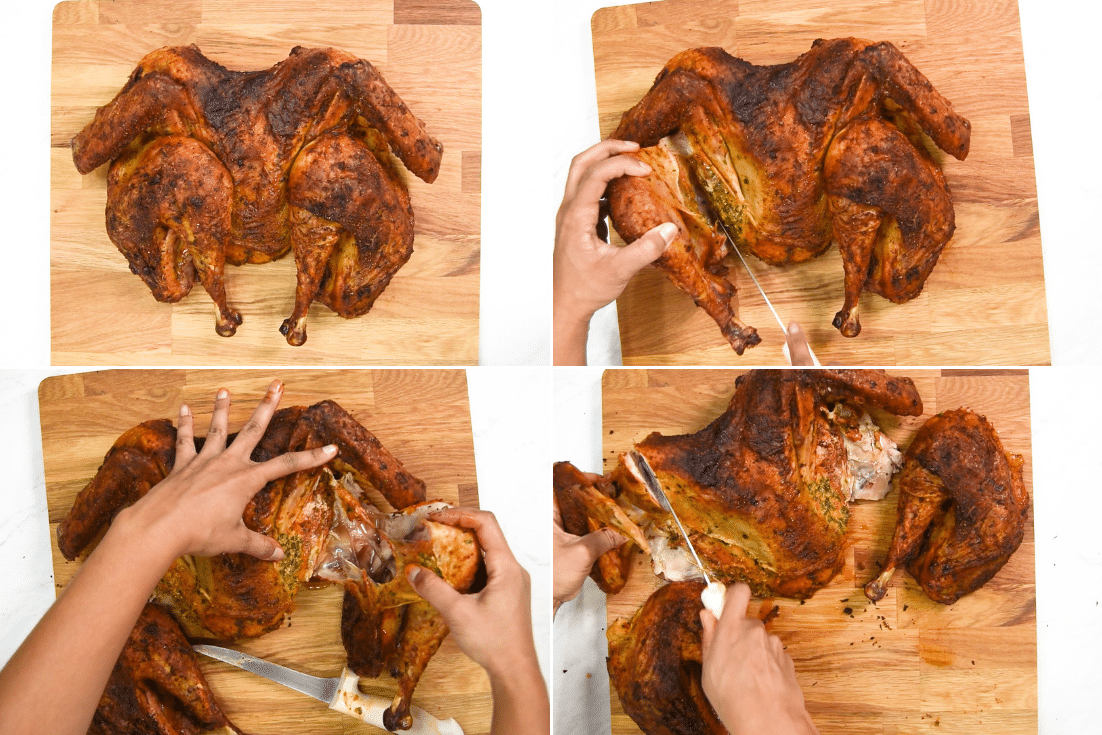
Then, lay the rested turkey on a large cutting board, breast-side up.
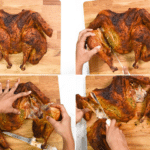
The best trick to find where to cut the turkey is to look for the joint – where there’s a joint, is where we cut. Cutting through the joints makes it easier for the knife to slice right through, so, if you feel resistance, or hit a bone, wiggle and bend, and try again.
That said, I like to start with the legs, especially when it comes to spatchcock turkeys. We just bend the leg back to find the hip joint. Then use a boning knife to slice through that joint and separate the leg from the “hip,” removing both the leg and thigh.
When it’s out, move on to the other leg and do the same thing.
Then, remove the wing the exact same way, bending the wing back and slicing at the “shoulder” joint. Do this for both sides and remove both wings.
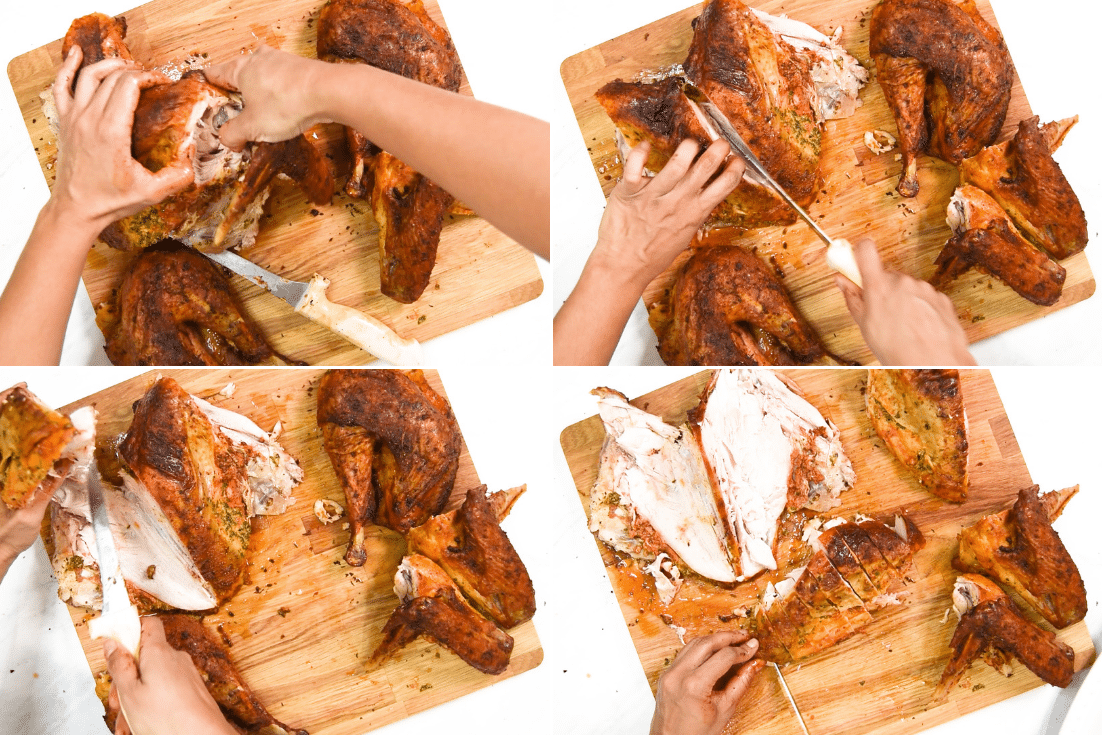
Then move on to the turkey breast.
Slice down the breast bone, gently following the hard line of the bone that separates the two breasts. Next, use a gently pulling motion to remove the breast from the bird in a whole piece, if possible. (This will make the slicing more neat!)
Repeat with the other breast.
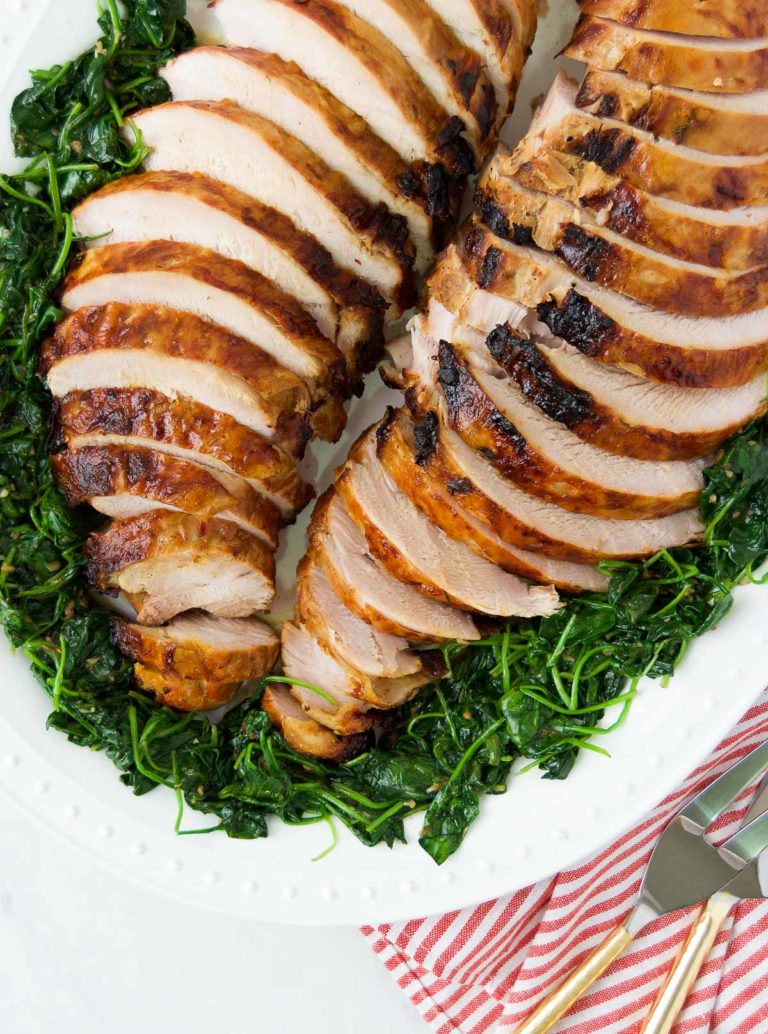
Slice the breast meat. I like to slice it on the thicker side in half an inch slices or so. You can make it thinner or thicker if you want, just depending on your likes and dislikes.
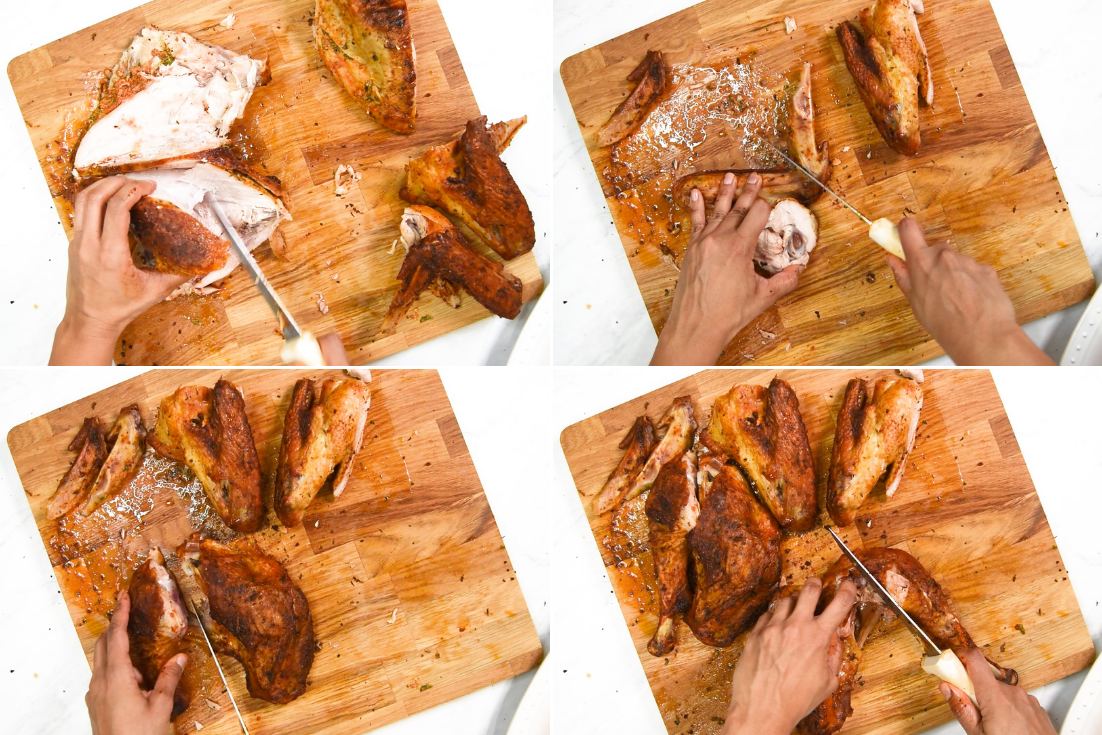
Then start to break apart the wings and the legs. Separate the drumsticks from the thighs by cutting through the “knee” joint.
Separate the wings from the tips by cutting through the “wrist” joints.
Remove the wing tips completely and and save them for stock, if you’d like. If not, discard. You can also slice through the “elbow” the same way, but I prefer to leave that in one piece.
Don’t forget to also save the turkey carcass for turkey stock! Toss it into a food storage bag and keep it in the fridge to make this delicious homemade Instant Pot Turkey Stock in a couple of days, or freeze the bones to make stock later.
You wont regret it—homemade stock makes the best soups! Besides, you went through all this work to make a turkey, so make it work for you now by getting multiple excellent meals out of it!!
How to display and garnish roasted turkey:
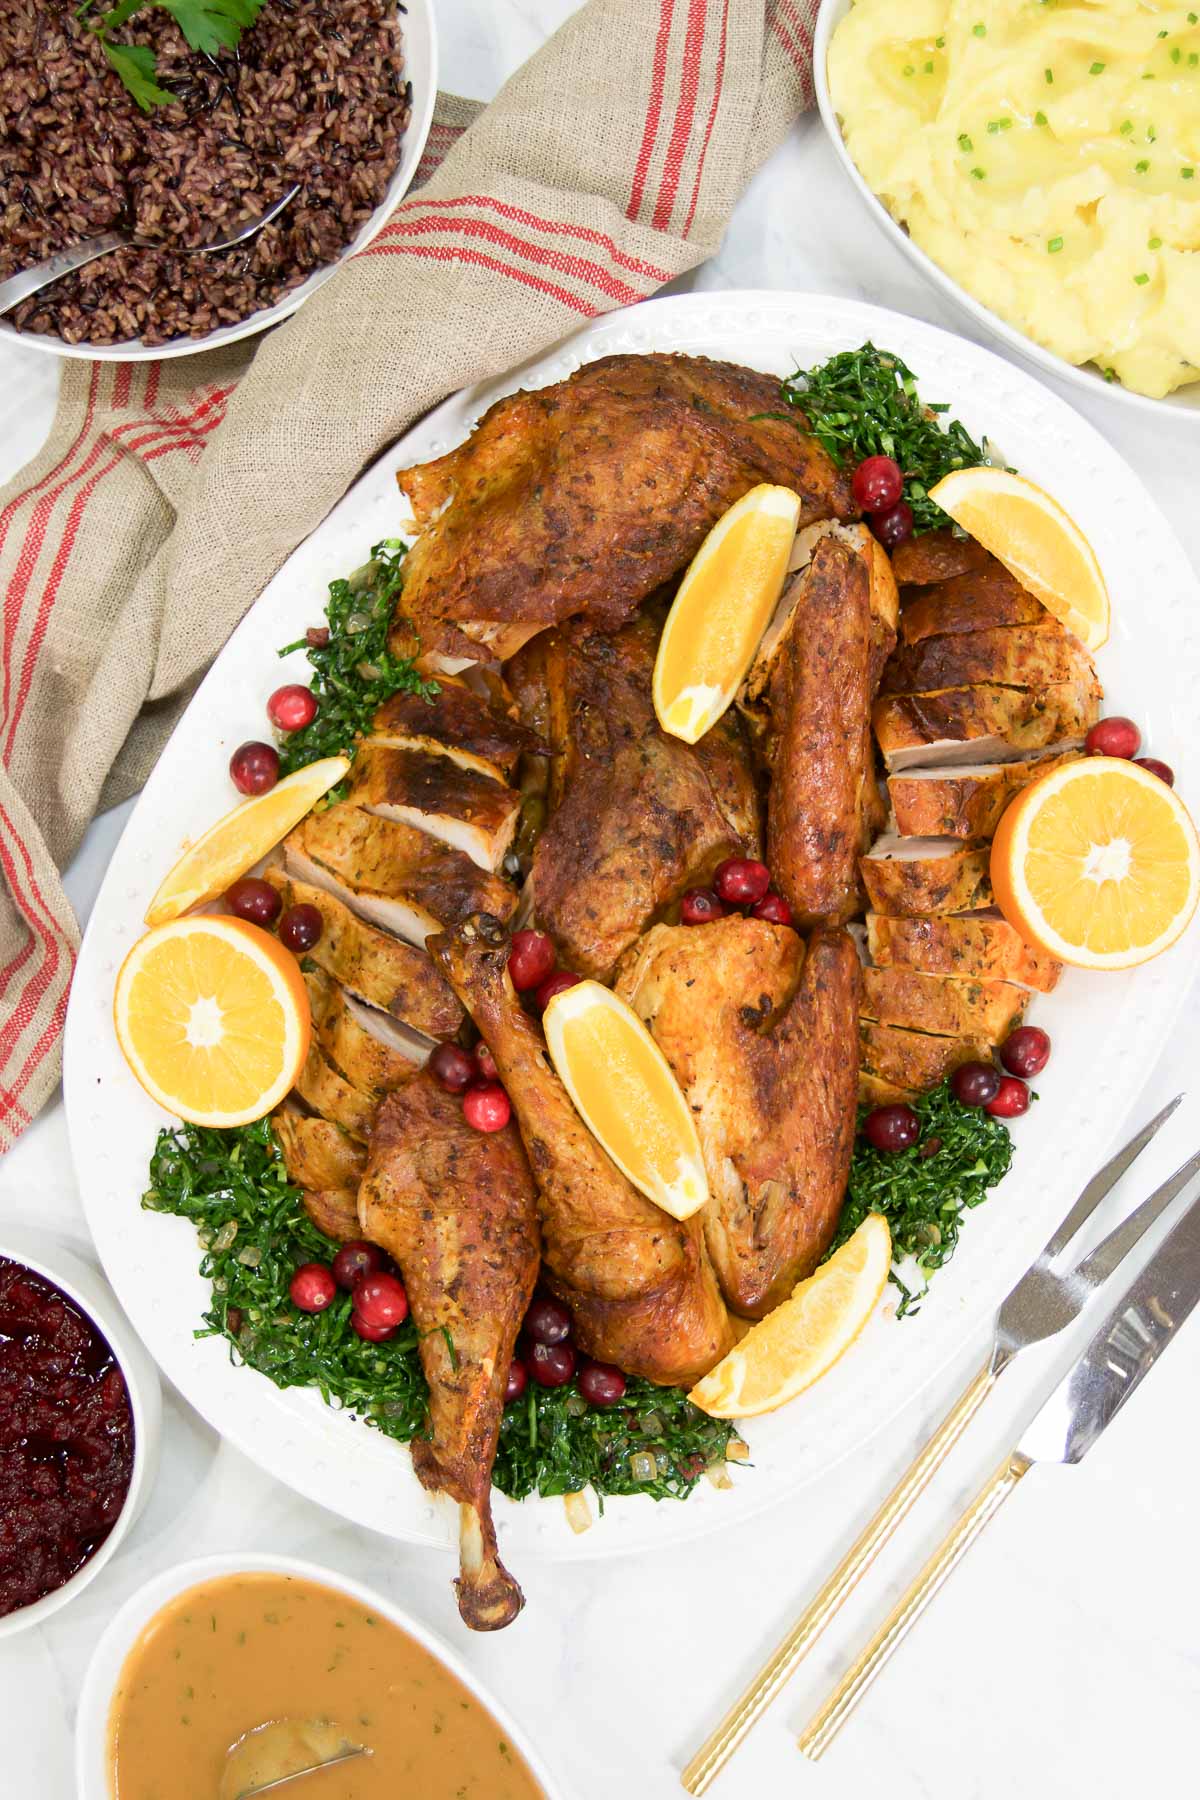
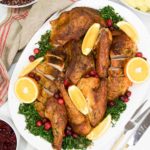
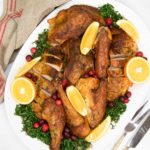
After you carve the turkey, arrange the pieces on a large serving platter.
To make my turkey platter look centerpiece-worthy, I like to add some greens to it to add contrasting color to the bird itself. My go-to is sauted Brazilian Collard Greens with Bacon because they’re easy to make, but you could also use this recipe and use kale or shredded brussels sprouts instead of the collards if you prefer.
You can also make nothing at all and simply throw fresh parsley or some arugula onto the platter with your bird and call it a day. That pop of green will already make it look great!
To easily take your turkey platter to the next level, add some orange slices and seasonal fruits like apples, cranberries or pomegranate pieces because those add a pop of color, too!
What to pair with turkey:
- Instant Pot Brown Rice
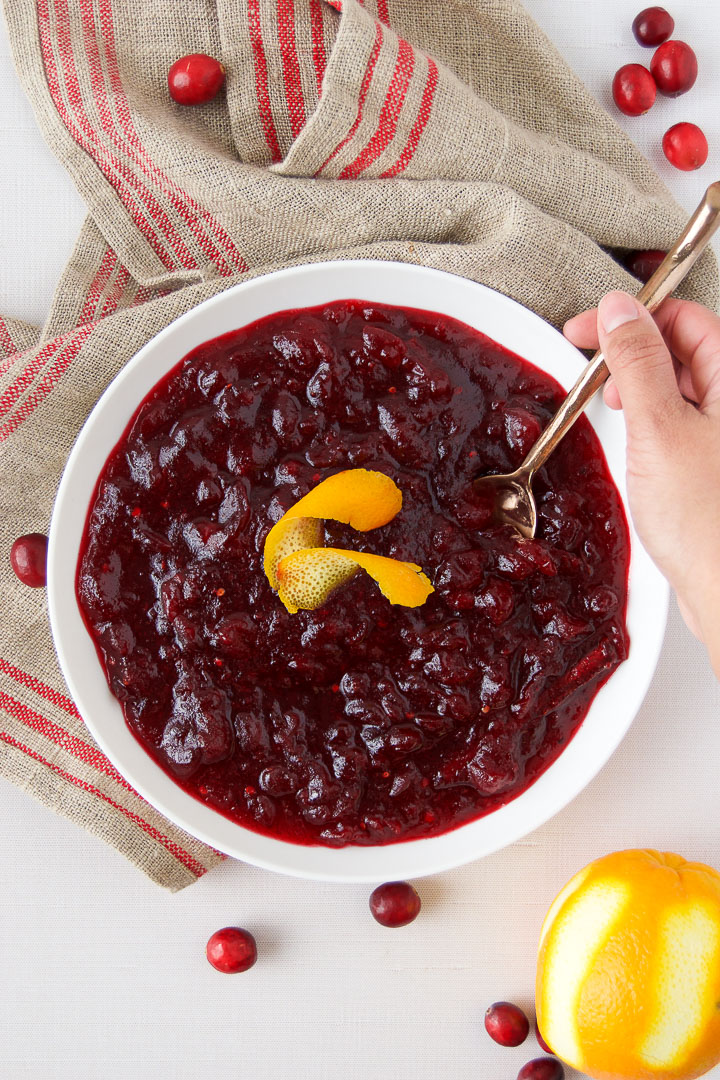
- Cachaca Cranberry Sauce
- Brazilian Collard Greens with Bacon
- Farofa – Toasted Cassava Flour
- Instant Pot Garlic Mashed Potatoes
- Brazilian Christmas Rice
Frequently Asked Questions
I rested my spatchcock turkey for an hour before carving to ensure it remained juicy.
Cover the turkey loosely in foil as it rests. Don’t make it too tight or your crispy skin will get soggy!
I prefer to use a boning knife to carve turkey. I’ve shared my favorites above.
FOR MORE BRAZILIAN FOOD INSPO, BE SURE TO FOLLOW ME ON
How to Carve a Spatchcock Turkey
Ingredients
- 1 cooked spatchcock turkey
Instructions
- Before you start carving your turkey, make sure you let it rest for about an hour so that the juices don't stream out of it as you're slicing it.
- Then, lay the rested turkey on a large cutting board, breast-side up.
- Start with the legs, by bending the whole leg back to find the hip joint. Then use a boning knife, slice through that joint and separate the leg from the "hip," removing both the leg and thigh. When it's out, move on to the other leg and do the same thing.
- Then, remove the wings the exact same way – by bending the wings back and slicing at the "shoulder" joint. Do this for both sides and remove both wings.
- Then move on to the turkey breast, and slice down the breast bone, gently following the hard line of the bone that separates the two breasts. Next, use a gently pulling motion to remove the breast from the bird in a whole piece, if possible. Repeat with the other breast.
- Slice the breast meat however thick you like – I like to slice it on the thicker side in half an inch slices or so.
- Then, start to break apart the wings and the legs by separating the drumsticks from the thighs by cutting through the "knee" joint.
- Next, separate the wings from the tips by cutting through the "wrist" joints. Remove the wing tips completely and and save them for stock, if you'd like. If not, discard. You can also slice through the "elbow" the same way, but I prefer to leave that in one piece.
Arrange and Decorate
- After you carve the turkey, arrange the pieces on a large serving platter.
- Decorate with greens, and fresh seasonal fruits.

Great info! Love using the spatchcock method for cooking both turkey and chicken, it’s so fast and easy but carving can still be a challenge.
This was such a helpful and foolproof method, to an otherwise intimidating task! Thanks so much!
This is a life saver! Your video on how to carve a turkey has been of big help to my kitchen!
Thanks for this! My husband and I were having a hard time figuring out how to carve a spatchcock turkey, and this was super helpful.
Thank goodness for your video!! All the tips and detailed how-tos here were so helpful — thanks to you we didn’t destroy the turkey ahaha hooray!